 |
||||||
|
||||||
|
||||||||
Photographer
Richard Sexton visited
Better Light’s studio
in San Carlos this past June
to learn more about our large-format
digital scanning backs. He
also brought along his Canon
EOS 1DS MK2 16-megapixel 35mm
DSLR, and some 4x5 B&W
sheet film, so he could make
a comparison among images captured
by familiar 4x5 sheet film,
a popular DSLR, and a scanning
back. Mr. Sexton details the
photographic setup in a thorough
article that can be found online
at the www.luminous-landscape.com web
site (full page address at
end of paragraph). In the article,
he describes how he uses two
stages of additional interpolation
and sharpening to increase
the file size from the 16-megapixel
Canon camera to approximately
the same size as the uninterpolated
file from the 144-megapixel
Better Light scanning back.
Several sets of “Detail” images
are displayed, and the author
states “I’ll
let the results speak for themselves,
i.e., I suggest you look at
the pictures first and make
some preliminary decisions
for yourself before reading
my comments.” He
later concludes “The
Better Light scan clearly has
the most detail, though in
many areas of the image it’s
a subtle difference. Also,
the color accuracy of the Better
Light scan is the best overall.” (full
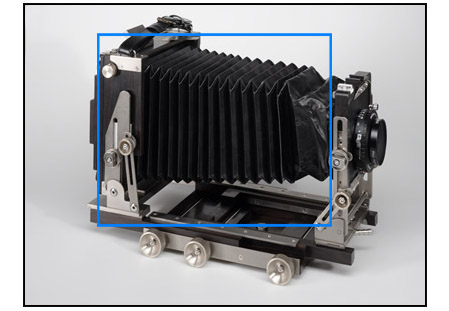
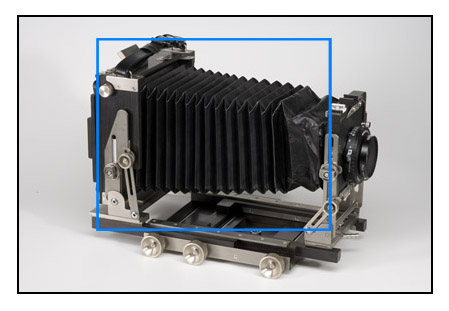
article: http://www.luminous-landscape.com/reviews/cameras/better-light.shtml) Below are similar “Detail” sections from the original 48-bit RGB images described by Mr. Sexton in his article, reproduced at 100% of the finished image size. Because these “Detail” images are much larger than the reduced-resolution versions in the article, only a portion of each “Detail” is displayed. These sections were each cropped from the original images, converted to 24-bit RGB, and saved as high-quality JPEG files. Interested readers can save these image sections, and open them in an image editor where they can be magnified for even closer inspection. Subtle image quality differences often become more apparent at 200% magnification, although JPEG compression adds minor artifacts that also show up more when magnified. Some readers might question the validity of such close examination of an image file, but anyone interested in obtaining the highest-quality images soon learns to appreciate this level of scrutiny. The Canon DSLR image is very well-behaved, but it still only contains a fraction of the information present in the Better Light image — one-ninth, to be exact. Just as it was with film, the improvement in image quality made possible by a large-format scanning back may not be needed for some applications, but photographers pursuing the absolute best should pay close attention. >> NEWLY ADDED – equivalent-resolution scans of Fuji Acros B&W film, as described in the article. Mr. Sexton mailed these to me from New Orleans just before Hurricane Katrina struck, and they didn’t arrive in time for the original article posting. I was surprised and pleased when his CD-ROM showed up a few weeks later, and we have now added the corresponding “Detail” sections from the 4x5 B&W film to this article, along with a few comments. Slight differences in size between the two cameras’ image sections are due primarily to differences in perspective — the view camera used swing, tilt, and ample rise to keep the subject square, but the DSLR captured the image without these camera movements. Parts of the subject closest to the DSLR lens are bigger than parts that are farther away, so it’s impossible to exactly scale one entire image to the other. It’s not clear that the view camera lens isn’t introducing some distortion of its own, either — in retrospect, we should have operated both cameras “straight on” for a closer scale match. This would also let the scanning back use the best (center) part of the lens, instead of being well off-axis. The images immediately below have each been scaled down by the same factor from the original 48-bit files described in the article, and the same size rectangle has been drawn on each image to help show differences in scale and perspective. (The B&W film image used the same 4x5 camera and lens, and was scanned and cropped to match the Better Light image size and resolution, so it also has the same perspective and scale.) |
OVERALL
IMAGE
|
|
 |
 |
BETTER LIGHT SUPER6K-HS final image (reduced)
|
CANON 1DS MK2 final image (reduced) |
Big image files like these are typically used for making big prints, or for archiving a large amount of information for future applications. Below are the print sizes that could be made from the original 6,000 by 8,000 pixel Better Light image shown above left, at several common print resolutions (expressed as the number of image pixels per inch of print). Also shown is the equivalent print size for each 480 x 360 pixel “Detail” image section that follows: 6,000
x 8,000
pixels at 300 pixels per inch
would make
a 20 x
26.7 inch
print (480
x 360 pixel
Detail would be a 1.6 x
1.2 inch
section) High-quality computer displays typically have between 80 and 120 pixels per inch, so the Detail sections below are typically being viewed on-screen at the size they would appear in a very large print. Such a large image may not be necessary for this particular subject, but may be more desirable for architecture and landscape photography, where the original subjects are typically much larger than the print.
|
|
DETAIL
1
|
|
 |
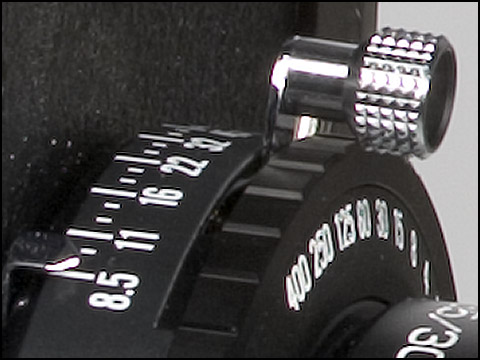 |
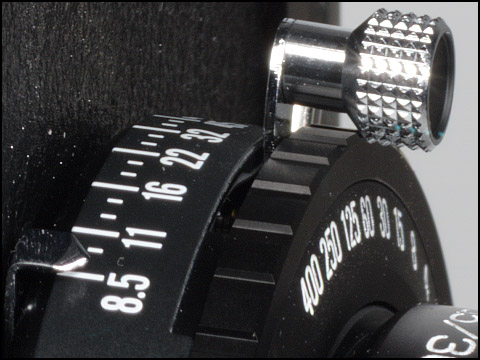
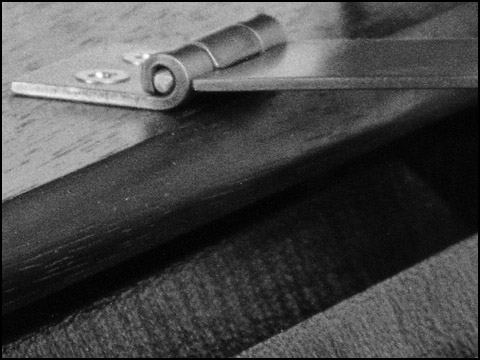
| BETTER LIGHT SUPER6K-HS at 100% native resolution | CANON 1DS MK2 interpolated as described in article |
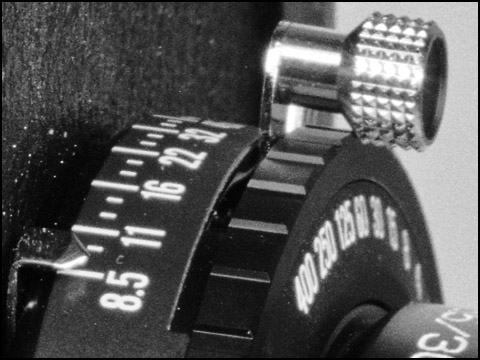 |
The Better Light image above has considerably more sharpness and detail in dark areas like the black wrinkle-finish lens board and the shutter speed ring around the lens. It also has cleaner highlights with smoother gradations, possibly due to less sharpening. The Canon image shows red edges on bright highlights, and has more noise in the light gray background. The four small cyan-colored spots in the Better Light image (near the knurled shutter-cocking knob) are “echoes” of the very bright specular highlights just above the cyan spots – these are caused by internal reflections in the cyan-colored infrared-blocking filter used with the scanning back. The light producing these cyan spots has been attenuated by over 9 f-stops (and turned quite cyan) by two internal reflections in the filter, indicating just how bright the specular highlights must be. (This is the first time that I’ve ever seen this, by the way...) The B&W film image used the same camera and lens as the Better Light image, so the difference in sharpness must be due to the film, processing, and/or scanning. Halation makes the white lettering less distinct, and graininess interferes with clarity everywhere else. |
FUJI
ACROS B&W FILM scanned as described
in article |
|
DETAIL
2
|
|
 |
 |
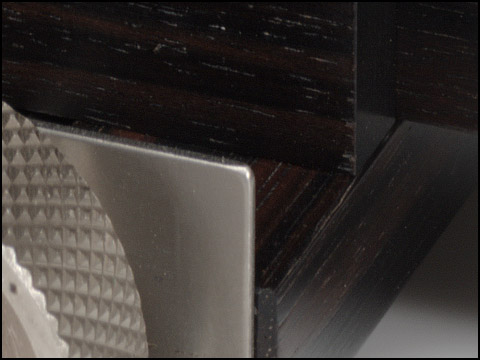
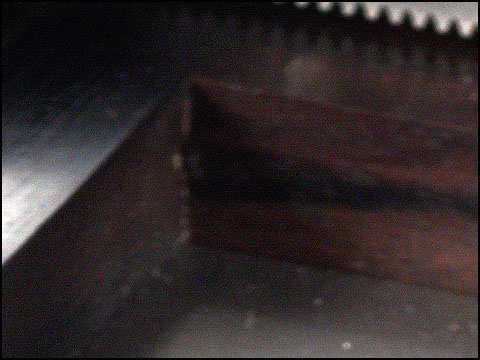
BETTER LIGHT SUPER6K-HS at 100% native
resolution |
CANON 1DS MK2 interpolated as described in article |
 |
The Better Light image above has both better definition (detail) and clarity (smoothness) in the wood grain, and less noise in the shadows behind the knurled focus knob and under the wooden rails. One Better Light user, who also has a Canon 1DS MK2, describes his Better Light images as being more “tactile” than others – perhaps another way of describing what you see here. The Canon DSLR does very well, but its image doesn’t have the depth or clarity of the scanning back’s image. The B&W film image shows good definition in the wood grain details, but has the highest noise (graininess) of the group. |
FUJI
ACROS B&W FILM scanned
as described in article |
|
DETAIL
3
|
|
 |
 |
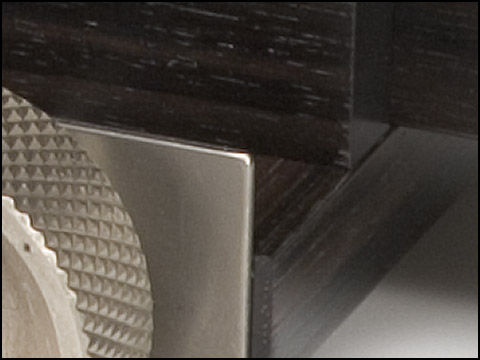
BETTER LIGHT SUPER6K-HS at 100% native
resolution |
CANON 1DS MK2 interpolated as described in article |
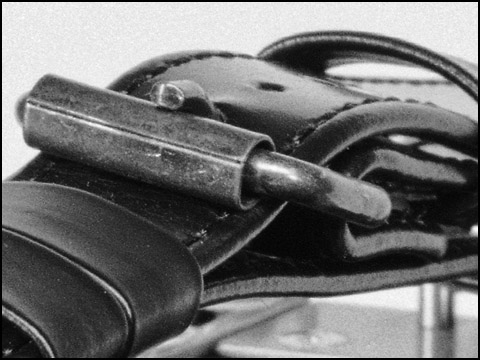 |
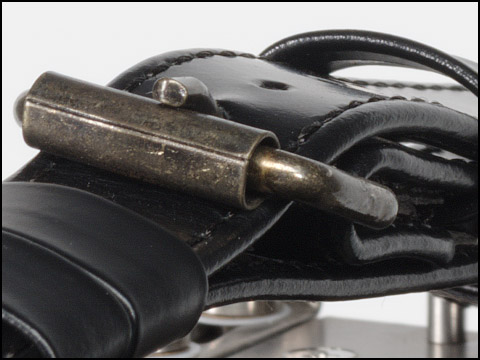
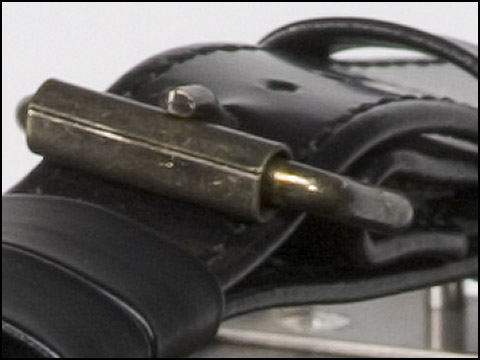
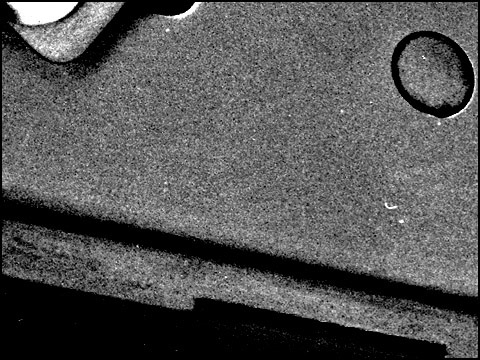
There is considerably more fine detail apparent in the Better Light image above, which also has smoother tones in the black leather strap and lower noise in the light gray background. The B&W film image has detail similar to the Better Light image, but graininess clouds the smoother tones and background. The uniform-brightness,
out-of-focus neutral background gives
us an opportunity
to measure the RMS noise in
the lighter tones: |
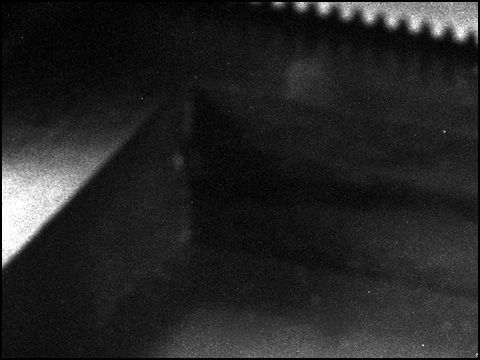
FUJI
ACROS B&W FILM scanned
as described in article |
|
DETAIL
4
|
|
 |
 |
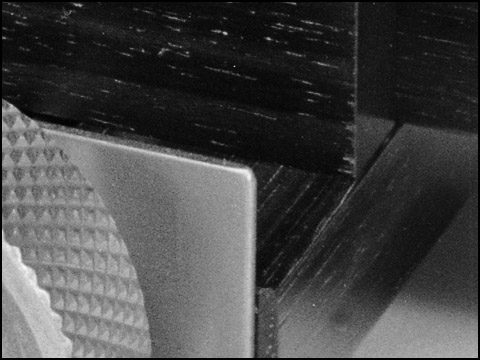
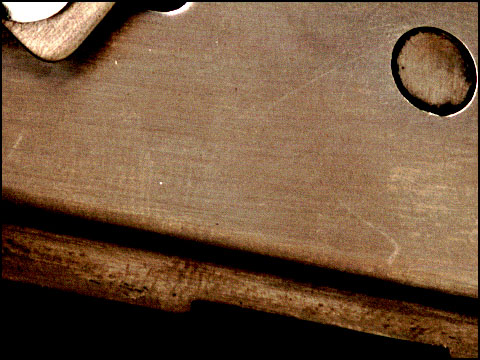
BETTER LIGHT SUPER6K-HS at 100% native
resolution |
CANON 1DS MK2 interpolated as described
in article |
 |
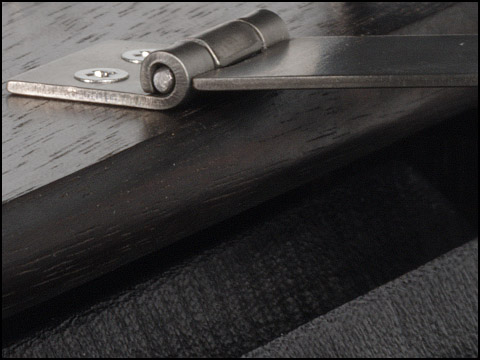
Some
of the difference in sharpness
between these image sections
may be due to differences in focus between
the 4x5 view camera and the 35mm DSLR – the
view camera used swings and tilts (along
with plenty of rear rise) to maintain
proper perspective and
place the plane of best focus parallel
to the side of the subject and midway
from front to back, while
the Canon was focused on the lens at
the front of the subject, so this latch
at the rear of the
subject was several inches behind the
Canon’s
best focus. The Better Light image
shows superior definition in both the
bellows and wood
grain, and less noise everywhere.
|
FUJI
ACROS B&W FILM scanned
as described in article |
|
At Better Light, we are accustomed to looking beyond the obvious to evaluate the quality of an image. In addition to examining images at high magnification, we often make exaggerated Levels adjustments to bring out detail in deep shadows or bright highlights, so we can see things that might not ordinarily be visible. |
|
DETAIL
5
|
|
 |
 |
BETTER
LIGHT SUPER6K-HS at 100% native
resolution enhanced to show shadow detail and noise |
CANON
1DS MK2 interpolated as described in
article enhanced to show shadow detail and noise |
 |
Above
are MODIFIED sections from
the deepest shadows of the
original full-resolution files
described in the article — these
sections have been brightened up by aggressive
Levels adjustments
to more clearly reveal noise and other
potential image quality problems. (Note
that JPEG-compressed images don’t
take kindly to aggressive Levels adjustments
— all you see is JPEG noise — so
we adjust the original 48-bit files,
convert them
to 24-bit RGB, and then save the adjusted
sections as high-quality JPEGs.) The
difference is pretty obvious here – the
Canon image maintains shadow tone separation
fairly well, but it has
significantly more noise than the Better
Light image, even though the DSLR was
operating at about
half the ISO sensitivity of the scanning
back — ISO
160 for the Canon vs. ISO 300 for the
Better Light. The
1DS MK2 may have good low-light sensitivity,
but this is not the same as having a
wide dynamic range,
where the large pixels of the scanning
back provide a decided advantage. |
FUJI
ACROS B&W FILM
scanned as described
in article |
|
DETAIL
6
|
|
 |
 |
BETTER LIGHT SUPER6K-HS at 100% native
resolution enhanced to show highlight detail and noise |
CANON 1DS MK2 interpolated as described in article enhanced to show highlight detail and noise |
 |
Finally,
above are MODIFIED sections
of the bright titanium brackets on the front standard of the subject,
to which an aggressive contrast boost
has been
applied to bring out subtle textures
and other low-contrast features, along
with any noise or
other artifacts. Note the much clearer appearance
of a smeared fingerprint in the Better Light image,
along with the lack of “interpolation bobble” – that
semi-random pattern in the DSLR image that looks
a lot like film graininess. Instead of being
sensor noise, I suspect that this “chatter” in
the image highlights is being created by the initial
color interpolation routines required by nearly
all instant-capture digital cameras. Considering
the opposing demands of achieving maximum
image detail from an RGB matrix of pixels
without introducing
obvious interpolation artifacts, I
regard this performance as exemplary,
although
it can never
be as good as having real RGB pixel data
to begin with. |
FUJI
ACROS B&W FILM scanned
as described in article enhanced to show highlight detail and noise |
|
IN CONCLUSION, I agree with everything that Mr.
Sexton has to say, but if his
article is going to let the images speak
for themselves, they should be allowed
to tell their entire story. I definitely
agree that any comparison like this should
be done with more than one type of subject,
and we look forward to presenting landscape
and architecture comparisons before long.
These comparisons are not particularly
intended to have a “winner”,
in my opinion, but they do benchmark
the relative capabilities of two rather
different image capture technologies.
The Canon EOS 1DS MK2 is an impressive
35mm DSLR that is making everyone familiar
with the potential of high-quality digital
image capture, while Better Light scanning
backs have quietly been producing superior
image quality for more than a decade.
Large-format B&W film has acquired
somewhat legendary status over its long
history, but doesn’t have the image
quality of its modern digital counterparts. Nobody
uses a scanning back, or a large-format
view camera, because they are easy – it’s
because the results are often worth the
extra effort involved. The time
required for a scanning back exposure
won’t appeal to everyone, and they
aren’t very effective for moving
subjects or low-light photography, but if
you understand and appreciate the advantages
of large-format photography, perhaps
your next DSLR shouldn’t be an
SLR…
CLICK
HERE to download
a 2.2 Mbyte JPEG file
of the Better Light
image of the Ebony
SV45U2. |