|
Pano/WideView™ Adapter
OBJECT Panorama - Sequence of Images of a Turning Object at Fixed Positions |
||||
|
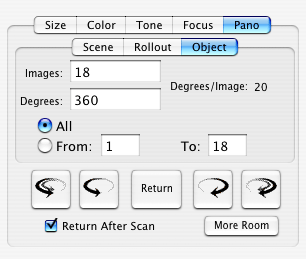
Hardware Setup The hardware is assembled just as it is for a Rollout panorama. Software Operation Enter the values for the number of Images and the Degrees of Rotation into their respective fields. The number of degrees between each image will be displayed. The first image taken will be at the starting position (0 degrees), then the stage will rotate the calculated number of degrees and the second image will be taken. This will continue until all the requested number of images are captured. For sequences less than 360 degrees, this technique leaves the stage one image position short of the total requested degrees. For example, if 180 degrees and 3 images are selected (60 degrees between images), the images will be taken at 0, 60 and 120 degrees for a total of 3 images. An image at 180 degrees will not be taken. If a final image is needed then after the degrees between images is calculated, add that number to the previous total and enter it into the Degrees field and add one to the number of Images. For our example, that would be 240 degrees and 4 images. That would then give images at 0, 60, 120 and 180 degrees for 4 total images. |
A method has been provided to take only a few images in the middle of a sequence. For instance, if it is needed to retake the third image of a 20 image sequence. This can be utilized by selecting the From radio button and entering the starting image number and the ending image number in the appropriate fields. After all the images are taken, use a program such as VR Works, Panorama Tools, or other QuickTime authoring software to assemble the individual images into a QuickTime movie. Most of these assembly programs want the images with a named sequence, hence the use of the Auto Naming function in the ViewFinder software. |
|||
|
Point-by-Point Description of Controls and Displays
|
||||