|
 By this time, digital cameras have demonstrated image quality superior to film cameras of similar format, and in some cases superior to even larger film formats. High-quality digital images exhibit outstanding sharpness, clarity, and color accuracy, with a flexible tonal scale that can exceed ten f-stops when desired. By this time, digital cameras have demonstrated image quality superior to film cameras of similar format, and in some cases superior to even larger film formats. High-quality digital images exhibit outstanding sharpness, clarity, and color accuracy, with a flexible tonal scale that can exceed ten f-stops when desired.
Canon’s remarkable EOS 1DS MK2 is a highly competent 35mm DSLR that is well-suited to field photography of all kinds. I am impressed with the tonal scale that Canon achieves with their 16 megapixel image sensor, and with this camera’s lack of color interpolation artifacts. Every reviewer agrees that this camera clearly exceeds the image quality of 35mm film, and its comprehensive controls allow precise exposure, whether manually determined, or fully automatic.
The large-format photographer, however, often isn’t interested in field photography requiring quick response, but instead concentrates on more stationary, contemplative imagery. Some time is always required to set up and properly focus a view camera, and exposure determination also requires measurement and consideration. The reward for the additional effort involved in setting up a large-format camera can be images of stunning detail and clarity, suitable for producing the finest large printed reproductions.
Large-format digital scanning backs were probably the first “digital cameras” to clearly demonstrate their superiority over (4x5”) film. In early 1994, landscape photographer Stephen Johnson (www.sjphoto.com) compared a variety of 4x5” film images to images captured with the first Better Light scanning back prototype, and stopped using film altogether soon thereafter. Many early adopters, and several magazine writers, subsequently made similar comparisons, and the results were unanimous, at least for those situations with suitable subject matter and sufficient illumination required for the scanning back. While most of these first-generation systems (licensed to Dicomed, Inc.) were sold for commercial studio photography applications, Steve began using his scanning back for landscape photography, often challenging wind and changing light conditions to capture images with a wide tonal scale, subtle gradations, and superb color accuracy.
One of the reasons I invented the large-format digital scanning back was for high-quality landscape photography, and it’s been particularly gratifying to see an increasing number of photographers using these demanding devices to capture their own views of the world around them. I have also had a few opportunities to “test” our scanning backs in the field, although not nearly as often as I would like. Back in July of 1996, I spent a few days in Yosemite National Park with a Dicomed Field Pro (Better Light’s first-generation scanning back), capturing images at several of the park’s better-known areas. Nine years later I returned to Yosemite with a Better Light Hi-Speed USB2 system, and visited some of the same places.
LARGE-FORMAT DIGITAL PHOTOGRAPHY EQUIPMENT — THEN AND NOW
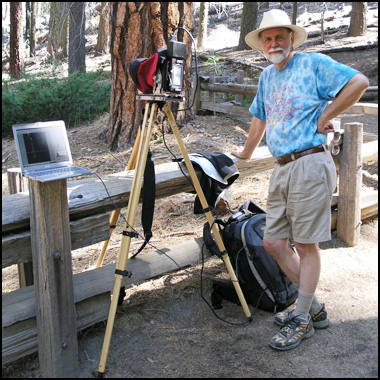
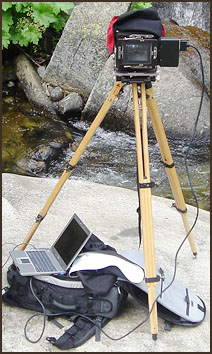
I like to hike to a good vantage point for a photograph, so being able to carry everything I need is essential. Back in 1996, my large-format photography backpack weighed 50 pounds and contained the following:
— Dicomed Field Pro control box, scanning insert, cables, and battery
— Toyo 45GII monorail (studio) 4x5 camera
— Three lenses in Toyo lens boards – 90mm, 150mm, and 240mm
— Apple laptop computer (probably still a monochrome model 160)
— Focusing cloth, loupe, etc.
I also carried a big Bogen tripod and head, probably weighing another 12 pounds. Good thing I was younger then – my pack had a waist strap and an internal frame, but it became HEAVY very quickly, especially at higher altitudes. The Toyo camera was quite sturdy, but the pan/tilt head on the tripod was a weak spot, especially in windy conditions.
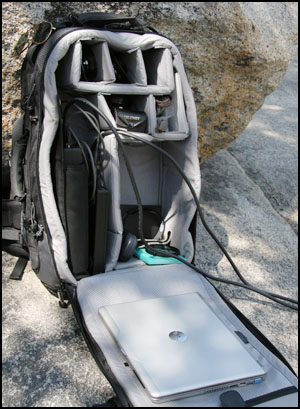
For my recent visit, I packed everything into a new Lowepro backpack that weighed 33 pounds and contained the following:
— Better Light Super6K-HS™ control box, scanning insert, cables, and battery
— Ebony SV45U2 folding (field) 4x5 camera
— Four lenses in Ebony/Linhof lens boards – 80mm, 135mm, 210mm, and 300mm
— Dell X300 laptop computer
— Focusing cloth, loupe, etc.
I also carried a big Ries tripod without a head that added another eleven pounds. I find that I don’t need a tripod head for most landscape photography, since the camera is usually level with the horizon. Even the excellent Ries tripod head is less stable than not using any head at all, and a sturdy view camera mounted directly to the crown of the Ries tripod is as close to “rock-solid” as possible. It’s easy to level the crown of the Ries tripod using its continuously-adjustable leg angles and lengths, although I have to mount a camera on this tripod to have bubble levels for doing the final adjustment. I still use a tripod head if the camera is to be tipped well off-level, though, and add the Ries head to the pack or to the tripod when I think I’ll need it.
 The reduction in weight from the 1996 backpack to the 2005 backpack was due to improvements in almost every piece of equipment: The reduction in weight from the 1996 backpack to the 2005 backpack was due to improvements in almost every piece of equipment:
|
|
1996
|
2005
|
| scanning back & battery |
15 pounds |
7 pounds |
| view camera & lenses |
16 pounds |
11 pounds |
| laptop computer |
7 pounds |
3 pounds |
| focusing cloth, etc. |
2 pounds |
2 pounds |
| backpack |
10 pounds |
10 pounds |
| TOTAL BACKPACK WEIGHT |
50 pounds |
33 pounds |
In addition to shedding pounds, much of the above equipment also shrank in size. The scanning insert hasn’t changed, but its control box and battery are a fraction of their original size, with fewer, smaller cables. Likewise, eschewing the big Toyo studio camera in favor of a more compact Ebony field model allowed the addition of a fourth lens while still saving space. Finally, the Dell laptop is half the weight and size of the older Apple laptop, with vastly improved performance (but still not enough battery run time). These reductions in volume allowed a somewhat smaller pack with a very convenient arrangement of dividers to hold everything comfortably. The new Lowepro pack has considerably more “rigging” than my old backpack, with a much wider, thicker waist belt and fully adjustable shoulder straps. While these prominent features make the pack a little bulkier to handle, they also provide far more comfort when the pack is being worn.
LARGE-FORMAT DIGITAL FIELD PHOTOGRAPHY — THEN AND NOW
Field photography with a large-format camera is already a fairly slow and methodical process, first involving careful setup and adjustment of the camera’s front and rear standards to achieve exactly the desired view and perspective, with the plane of best focus precisely placed within the scene. After setting up the camera, exposure is often determined by taking meter readings of the scene, in conjunction with the photographer’s experience using a particular type of film. Field photographers usually don’t carry and shoot Polaroid film to test their exposure settings, so they’ll often bracket their film exposures to help ensure a properly-exposed image.
Digital scanning backs certainly fit with the “slow and methodical” part of using a view camera – aside from a slightly smaller image area (denoted by a low-tack adhesive mask on the camera’s ground glass), setting up the camera for a scanning back is the same as doing so for film. Possible differences might include a desire for better critical focus because of the scanning back’s improved image quality, and a corresponding desire to avoid very small (high f-number) lens apertures. Smaller lens apertures were often out of the question with earlier scanning backs because of their limited ISO sensitivity. Smaller apertures also introduce diffraction, which degrades the resolution and detail of an image.
After setting up the camera, however, digital photography can often proceed more rapidly than with film, even when using a scanning back. Instead of carefully measuring the light reflected from a scene and making a mental evaluation of the correct exposure, a digital photographer can simply guess at an initial exposure setting, and then make any needed exposure adjustments based on feedback from an initial prescan image that is displayed on the laptop screen. This prescan image provides both a visual representation, and precise digital values for each pixel, so the photographer can use both sides of their brain to evaluate exposure. In addition to being able to set an equivalent “shutter speed” in 1/3 f-stop increments, the ISO sensitivity and characteristic curve of the scanning back are also adjustable. Once the correct exposure parameters have been determined, a final scan is made of the scene.
Lighter weight and smaller size aren’t the only parameters that Better Light’s new “HS” series of scanning backs improved – speed of operation, both for setup and final scanning, has also improved dramatically since our first-generation systems. This faster operation is the result of enhancements to both the control software and the scanning hardware. Of course, laptop computers have also become much faster, too.
In 1996, the Dicomed scanning back had a fastest Line Time exposure of 1/50 second, with a maximum daylight ISO capability of around 400. Line Time exposure was adjustable in 1/3 f-stop increments over a limited range from 1/8 sec. per line to 1/50 sec. per line – less than three f-stops of range! ISO sensitivity could also be adjusted over another two f-stops (using daylight color balance), although only in full-stop increments. Any exposure or color balance adjustments required another prescan to see and measure the effects of the changes. The fastest prescan time was around 20 seconds, plus another 15 seconds for the scanning mechanism to move to its starting position. The fastest final scan time was 2 minutes and 30 seconds for a 6,000 x 7,520 pixel, 24-bit RGB image. A seven pound battery would operate the system for about two and a half hours.
The laptop computers available in 1996 often didn’t allow you to retrieve and open the huge 129 Mbyte images captured by the Dicomed scanning back, due to their limited performance. Just retrieving these files required several minutes, but opening them in Photoshop might take 20 minutes or longer because the laptop wasn’t able to hold much RAM, so its disk drive had to be used for Photoshop’s virtual memory. Besides, the laptop screens of the time wouldn’t give you a very representative view of your image anyway, although it was (and still is) a thrill to see a just-captured image being displayed, even on a modest laptop screen.
Nine years later, Better Light’s models 6000E-HS, 6000-HS, and Super6K-HS scanning backs have a fastest Line Time exposure of 1/240 second, with a maximum daylight ISO capability of around 3200 (1600 for the 6000E-HS). Line Time exposure is now adjustable in 1/3 f-stop increments over a broader range from 1/8 sec. per line to 1/3000 sec. per line (however, Line Time settings shorter than 1/240 sec. don’t decrease the overall scan time), providing from five to eight f-stops of range. ISO sensitivity is now adjustable in 1/10 f-stop increments over as much as four additional f-stops (using daylight color balance). All software-controlled exposure, color balance, and/or contrast adjustments are immediately simulated in the existing prescan image, greatly reducing the number of prescans required to achieve perfect exposures. The fastest prescan time is now about 4 seconds, plus another 4 seconds for the scanning mechanism to move to its starting position. The fastest final scan time is now 35 seconds for a 6,000 x 8,000 pixel, 48-bit RGB image. A three pound battery will operate the system for about seven hours.
Today’s laptop computers have likewise improved, featuring full-color high resolution displays and many times faster performance. It’s now possible to be looking at a 274 Mbyte 48-bit RGB image within a minute of its capture, using a laptop that’s half the weight and size of its predecessors.
In the field, these improvements translate into considerably faster setup times with more accurate exposures, as well as faster final scan times for fewer problems with moving subjects or rapidly changing light.
LARGE-FORMAT DIGITAL FIELD PHOTOGRAPHY – SOME CHALLENGES
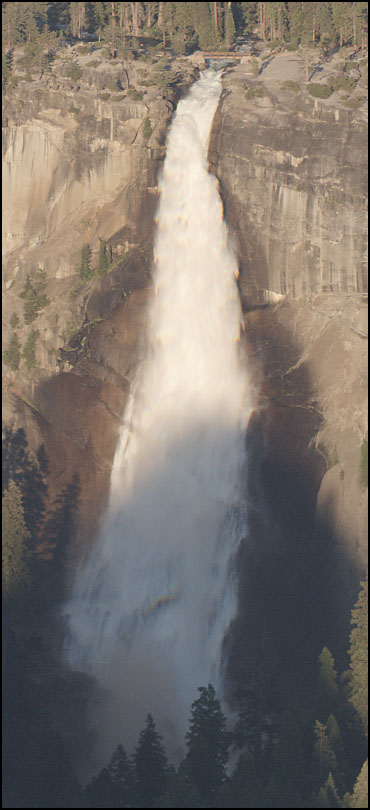
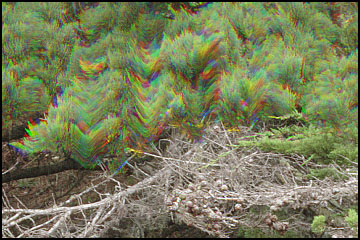 Large-format scanning backs have the potential for capturing some of the highest-quality images currently possible, but they also have some fairly stringent limitations on their use. Because of the time required for each image capture, scanning backs can generate some unique image characteristics when parts of the subject being photographed move as the image sensor is recording them. Moving subjects do not blur in the traditional photographic sense, but instead are recorded as a smooth series of “time slices” by the scanner. Sometimes, this effect can be very interesting… Even when photographing the very stationary granite mountains in Yosemite, one must keep the view camera completely motionless for the duration of the final scan. If the camera moves during a scan, a local disruption in the image may get recorded, creating a different kind of “motion artifact”. Large-format scanning backs have the potential for capturing some of the highest-quality images currently possible, but they also have some fairly stringent limitations on their use. Because of the time required for each image capture, scanning backs can generate some unique image characteristics when parts of the subject being photographed move as the image sensor is recording them. Moving subjects do not blur in the traditional photographic sense, but instead are recorded as a smooth series of “time slices” by the scanner. Sometimes, this effect can be very interesting… Even when photographing the very stationary granite mountains in Yosemite, one must keep the view camera completely motionless for the duration of the final scan. If the camera moves during a scan, a local disruption in the image may get recorded, creating a different kind of “motion artifact”.
Scanning backs also have somewhat limited low-light sensitivity, and final scans can take considerably longer under low light conditions. One quickly learns to appreciate wider lens apertures, both for the additional light they allow into the camera, and for the improved image quality (reduced diffraction) they often provide. Aperture settings of f-11 to f-16 become the norm whenever possible, with careful placement of the plane of best focus within the image. While the standard rules for depth of field still apply, a large digital image is usually observed (and evaluated) at much larger sizes than those used by traditional depth of field calculations (typically an 8x10 inch print viewed at close focus by somebody with better eyes than mine). Inspection at higher image magnification means that more of the image than expected may appear “out of focus”, or alternatively, that a tighter standard for depth of field must be applied. After wandering around in a few properly-exposed and focused images captured by a scanning back, it’s easy to become obsessed by the detail delivered at perfect focus from a high-quality lens. What’s often less apparent is how gracefully a scanning back handles out-of-focus areas, with smooth, noise-free gradations not possible with film. This isn’t much consolation if the entire image is out of focus, but might become a feature if limited depth of field doesn’t always reach far enough.
Battery operating time for both the scanning back and laptop computer is another consideration. Third-party batteries are now available that can operate a Better Light USB2 scanning back for over seven hours, but very few laptops will operate for even three hours on their standard batteries, so supplemental laptop power may be needed. Having plenty of RAM in the laptop will allow programs to open large image files more rapidly, and also lets the laptop’s OS switch between programs quickly, both of which will help conserve battery power. An inexpensive DC-to-AC inverter can be used to recharge everything from an automobile battery, and solar panels are now available that can provide enough power to operate or recharge everything from a notebook-sized package that opens up into four or six panels.
Finally, the very high image quality potential of the scanning back can become its own challenge, mercilessly revealing slight errors in camera setup, focus, or exposure that might have gone unnoticed with film. Several Better Light users have admitted that their scanning back has made them a better photographer, simply by allowing them to closely inspect their images right after each exposure.
LARGE-FORMAT DIGITAL FIELD PHOTOGRAPHY – THE PROCESS
Despite the challenges, making landscape photographs with a digital scanning back can be a very satisfying experience, providing the photographer with the finest images they’ve ever created. This impressive capability is the result of outstanding hardware performance coupled with immediate, accurate feedback about how the image will be recorded, allowing precise adjustments for perfect exposures. Of course, one still must be in the right place at the right time, since scenery and lighting are otherwise beyond the photographer’s control.
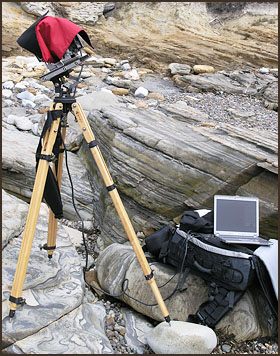
 Better Light’s latest USB2 scanning backs are quite easy to operate in the field. A sturdy 4x5 camera with the lens focal length of choice is first set up and focused as usual, observing the slightly smaller image area denoted by a viewing overlay on the camera’s ground glass. A cyan-colored glass infrared-blocking filter must be installed on either side of the lens for normal color photography; omitting this filter allows the system to capture very interesting near-infrared images. Any combination of view camera movements can be utilized to achieve the desired composition. Focus should be done very carefully – while there is often plenty of depth of field outside the camera at or near infinity focus, the depth of focus inside the camera becomes extremely shallow under these conditions, requiring precise placement of the image plane. The scanning back’s image sensor has been factory-adjusted to well within the ANSI specification for correct focus position, so what you see on the ground glass of a properly-adjusted view camera should be exactly what the scanning back records. Better Light’s latest USB2 scanning backs are quite easy to operate in the field. A sturdy 4x5 camera with the lens focal length of choice is first set up and focused as usual, observing the slightly smaller image area denoted by a viewing overlay on the camera’s ground glass. A cyan-colored glass infrared-blocking filter must be installed on either side of the lens for normal color photography; omitting this filter allows the system to capture very interesting near-infrared images. Any combination of view camera movements can be utilized to achieve the desired composition. Focus should be done very carefully – while there is often plenty of depth of field outside the camera at or near infinity focus, the depth of focus inside the camera becomes extremely shallow under these conditions, requiring precise placement of the image plane. The scanning back’s image sensor has been factory-adjusted to well within the ANSI specification for correct focus position, so what you see on the ground glass of a properly-adjusted view camera should be exactly what the scanning back records.
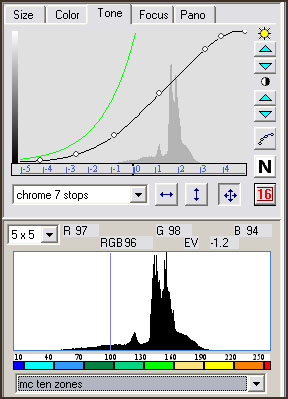 After setting up the camera and stopping down the lens as desired, the scanning back and laptop are turned on, and the scanning insert is put into the camera just like a slightly oversized film holder. The lens preview lever remains open, since its shutter is not used to control exposure. Usually, an initial guess is made for the exposure settings, since it’s easy to make changes later. The scanning back’s exposure is determined by both an adjustable Line Time setting, which corresponds to the shutter time for a film exposure, and by an adjustable ISO sensitivity that can be varied over as much as four f-stops. Color balance of the system is also adjustable – the photographer can use a previously-determined color balance setting, or make a custom color balance from a gray card in the prescan image area. Finally, dynamic range can also be adjusted by means of a Tone curve representing the “D-logE” (Data as a function of log Exposure) characteristics for the system. After choosing an initial Line Time, ISO, Color balance, and Tone curve, a quick prescan is made of the image. The prescan is a low-resolution (750 x 1000 RGB pixels for most models) 16-bit per color image that takes as little as ten seconds overall. The prescan image display updates “live” as the prescan proceeds, so you can see right away if you forgot to install the IR-blocking filter or stop down the lens, and cancel the prescan to make corrections. After setting up the camera and stopping down the lens as desired, the scanning back and laptop are turned on, and the scanning insert is put into the camera just like a slightly oversized film holder. The lens preview lever remains open, since its shutter is not used to control exposure. Usually, an initial guess is made for the exposure settings, since it’s easy to make changes later. The scanning back’s exposure is determined by both an adjustable Line Time setting, which corresponds to the shutter time for a film exposure, and by an adjustable ISO sensitivity that can be varied over as much as four f-stops. Color balance of the system is also adjustable – the photographer can use a previously-determined color balance setting, or make a custom color balance from a gray card in the prescan image area. Finally, dynamic range can also be adjusted by means of a Tone curve representing the “D-logE” (Data as a function of log Exposure) characteristics for the system. After choosing an initial Line Time, ISO, Color balance, and Tone curve, a quick prescan is made of the image. The prescan is a low-resolution (750 x 1000 RGB pixels for most models) 16-bit per color image that takes as little as ten seconds overall. The prescan image display updates “live” as the prescan proceeds, so you can see right away if you forgot to install the IR-blocking filter or stop down the lens, and cancel the prescan to make corrections.
Once an initial prescan has been completed, the photographer has a variety of tools to help determine the correct exposure. The prescan image is displayed in full color at selectable magnification, although field conditions don’t always provide good viewing conditions for the laptop screen. The camera’s focusing cloth, or a dedicated laptop “hood”, can be used to improve viewing conditions. A histogram in the Tone curve area shows the relative distribution of “raw” prescan image data prior to the application of a Tone curve (affected only by exposure settings), while a second histogram that’s always visible shows the “final” distribution of image data after all adjustments, which is also what’s displayed as the prescan image. Any time the cursor is in the prescan image area, the RGB data values for the pixel (or averaged group of pixels) directly under the cursor are displayed on the screen, just like using a spot meter to evaluate the scene.
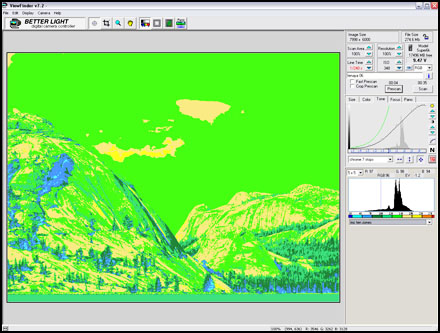
Another powerful exposure evaluation tool is Better Light’s “ToneZones™” feature, which false-colors the prescan image based on its data values. Turning on this tool immediately identifies potentially under- or over-exposed regions in the image through a series of user-selectable colors applied to user-selectable data values. For example, I’ve made a ToneZones setting with ten different colors for ten bands of image data, much like the traditional film Zone system might use – there are eight bands each 30 data values wide, with a narrow “guard” band at either end to indicate under/over exposure. Coming up with ten easily-differentiated colors in a logical sequence took some trial and error, but now I’m learning to “place” the image data values exactly where I want them, simply by looking at the false-colored image while I adjust the exposure and/or Tone curve settings – very nice!
 |
 |
|
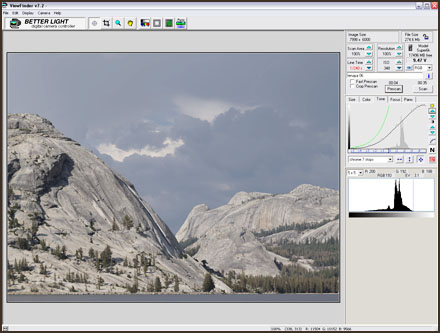
ViewFinder™ software standard prescan display
|
ToneZones™ false-colored prescan display
|
Whether or not ToneZones is turned on, any adjustments to Line Time, ISO, Color balance, and/or Tone curve settings are immediately applied to the existing prescan image data, allowing the photographer to quickly “dial in” the correct exposure settings without requiring additional prescans. The digital values underlying the displayed image are also altered to reflect any adjustments being made, so all of the above exposure tools remain accurate. A fresh prescan can be made at any time, if desired, to replace any simulated adjustments with new data actually captured using the latest settings. This can be useful when large exposure adjustments have been made, since under-exposed shadows get noisy when brightened, and over-exposed highlights won’t recover detail when darkened.
Taking an initial prescan and making any necessary adjustments using the above exposure evaluation tools can literally take less than a minute, although some contemplation about proper exposure as the image is inspected usually makes this process take somewhat longer. This is creative time (not waiting time), and often serves to refine the image well beyond what was possible when using film, even with meticulous spot metering. I usually take one last prescan after all adjustments have been made, just to make sure nothing has changed in the scene. New image data overwrites old data in “real-time” as the prescan progresses, making it easier to see any changes in the scene since the previous exposure.
After all adjustments have been made, one can “lock” the exposure and make adjustments to the Line Time (which affects overall scan time), or the ISO (which affects image noise), while the software automatically makes appropriate changes to the setting not being adjusted to maintain exactly the same overall exposure. This lets the photographer optimize overall capture time or image quality, as the situation dictates, without disturbing an already-determined exposure. Finally, all Better Light scanning backs feature adjustable Resolution, allowing the final image to be captured at one of several overall pixel dimensions. Lower-resolution images have fewer lines of pixels, and take correspondingly less time to capture – this can sometimes be a factor when light levels are changing rapidly, or when there’s unavoidable movement in the scene. Image and file sizes, and overall scan time, are displayed on the screen and update immediately as adjustments are made.
At last, it’s time for the final scan – perhaps waiting for a lull in the breeze, or for a cloud to move into (or out of) position, before clicking the “Scan” button. The system performs a fresh dark calibration prior to every scan (or prescan), which can take up to eight seconds at the longest Line Time settings, and then takes another four seconds to move the scanning mechanism to its starting position at the far end of the insert. All scans then proceed smoothly across the selected area without stopping and starting, as other scanners often do to control the flow of data. Better Light systems feature a dedicated disk drive for initial image storage, allowing uninterrupted data flow of up to 16 Mbytes per second – almost 500 megapixels per minute.
 Waiting for a final scan to complete seems to take forever at long Line Time settings, but the faster settings zip right along – for example, many outdoor scenes can be captured at the USB2 system’s fastest Line Time setting of 1/240 sec., in conjunction with ISO settings from 200 to around 3000 (100 to around 1500 for the “E” models), so a full-resolution scan from a model 6000(E)-HS only takes 35 seconds. A progress bar moves across the prescan image to show the sensor position as the final scan proceeds, but the image itself isn’t updated during a final scan. I tend to watch where the scanner is “looking” in the original scene during longer scans – if something disturbs that part of the scene currently being scanned, I can decide whether to abort the scan and start over. Believe it or not, I actually relish this time spent scanning each image – it seems a more fitting conclusion to the time spent setting up the camera and determining exposure, and I know what to look forward to if everything has been done properly. I don’t have to wait long to find out whether I was successful, either... Waiting for a final scan to complete seems to take forever at long Line Time settings, but the faster settings zip right along – for example, many outdoor scenes can be captured at the USB2 system’s fastest Line Time setting of 1/240 sec., in conjunction with ISO settings from 200 to around 3000 (100 to around 1500 for the “E” models), so a full-resolution scan from a model 6000(E)-HS only takes 35 seconds. A progress bar moves across the prescan image to show the sensor position as the final scan proceeds, but the image itself isn’t updated during a final scan. I tend to watch where the scanner is “looking” in the original scene during longer scans – if something disturbs that part of the scene currently being scanned, I can decide whether to abort the scan and start over. Believe it or not, I actually relish this time spent scanning each image – it seems a more fitting conclusion to the time spent setting up the camera and determining exposure, and I know what to look forward to if everything has been done properly. I don’t have to wait long to find out whether I was successful, either...
In the current USB2 models, all image data is stored as 16-bit per color “raw” data, and the selected Tone curve points are stored with the image data. This makes it possible to retrieve an image from the system’s disk drive with either 8 or 16 bits per color, using either the previously-selected Tone curve, or any other Tone curve that’s currently in the Tone curve editor. It’s also possible to retrieve the original “raw” image data, which is linear with intensity and always 16 bits per color. The same image file can be retrieved several different ways, if desired. I’ve preset my Tone curve to 16 bits per color, so my images are retrieved as 48-bit RGB through the Tone curve I selected when I made the exposure, unless I choose otherwise. These 48-bit RGB images open in Adobe Photoshop as “finished” images, but they can still be adjusted significantly, if desired, since they have as many as ten thousand unique intensity values, instead of just the 256 intensity values of a 24-bit RGB image.
Depending on the situation, I may sometimes capture several images of the same scene (if there’s moving water or other changing conditions), or I may retrieve a just-completed scan for further examination in Photoshop. Image data gets transferred from the disk drive in the control box to the laptop’s disk drive at a sustained rate of about 12 Mbytes per second, so a typical 274 MB 48-bit image file takes about 25 seconds to retrieve. Many recent laptops stuffed with RAM will let Photoshop open a 274 MB file in less than 20 seconds, and rotate it (if necessary) just as quickly, so you can be looking at the final full-resolution image within a minute after its capture. In most cases, the laptop’s battery will limit overall operating time, so one learns to minimize these Photoshop inspections in the field. I often do further examination of image files while I’m recharging the laptop, since both of these take some time anyway.
TENAYA LAKE, YOSEMITE
 |
 |
|
|
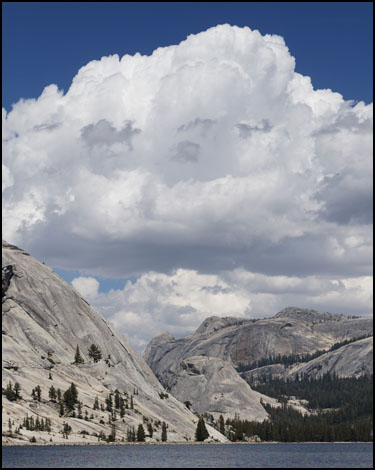
1996 Dicomed scan: July 8, 1996 at 2:00 PM
6000 x 7520 RGB pixels - 8 bits per color (24-bit RGB)
240mm lens at f-16 - Chrome 6 Tone curve
1/50 sec. Line Time - ISO 100 Daylight
Total scan time: 150 seconds for 129 Mbyte image
|
|
 |
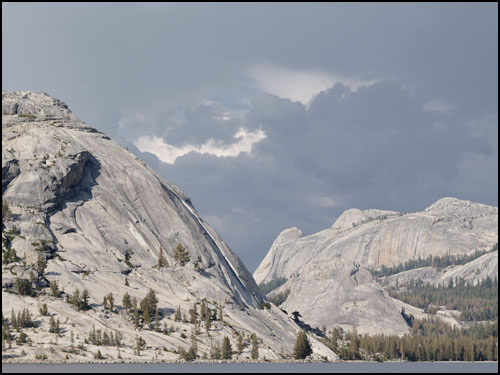
2005 Better Light scan: July 20, 2005 at 5:13 PM
6000 x 8000 RGB pixels - 16 bits per color (48-bit RGB)
300mm lens at f-16 - Chrome 7 Tone curve
1/240 sec. Line Time - ISO 350 Daylight
Total scan time: 35 seconds for 274 Mbyte image
Full resolution image available for viewing. Click here.
|
|
For the dramatic thundercloud in the 1996 Dicomed scan at Tenaya Lake, I chose a Tone curve with six f-stops of “usable” dynamic range (six f-stops between data values 15 and 240, plus some toe and shoulder at either end), which was designed to mimic the D-logE characteristic curve of Ektachrome film. This Tone curve and the resulting exposure produced great detail in the clouds, but made the trees and shadow areas rather dark. This image was scanned at the fastest Line Time setting for the Dicomed – 1/50 second per line, so the entire image took 150 seconds (two and a half minutes) to record.
Nine years later, I was again rewarded by gathering storm clouds for the 2005 Better Light scan at Tenaya Lake, but the light was quite different this time around, with darker clouds and later afternoon sun. Remembering the dark trees of the earlier Dicomed image, I chose a Tone curve with 7 f-stops of usable range to provide a longer tonal scale with correspondingly lower contrast. This Tone curve and the resulting exposure made the trees and shadows brighter, while retaining detail in the lighter tones. This image was scanned at the fastest Line Time setting for the current USB2 Better Light – 1/240 second per line, so the entire image took 35 seconds (just over half a minute) to record – over four times faster.
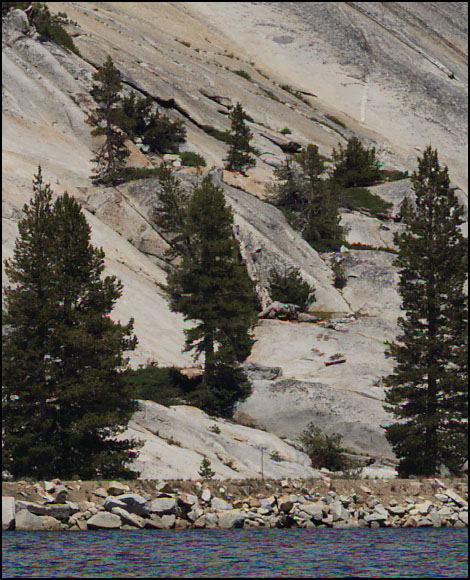
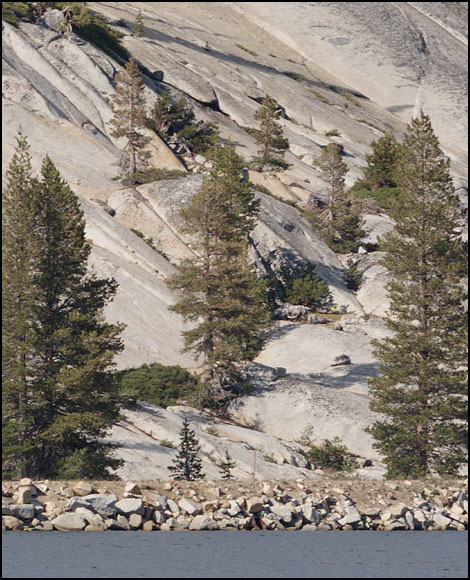
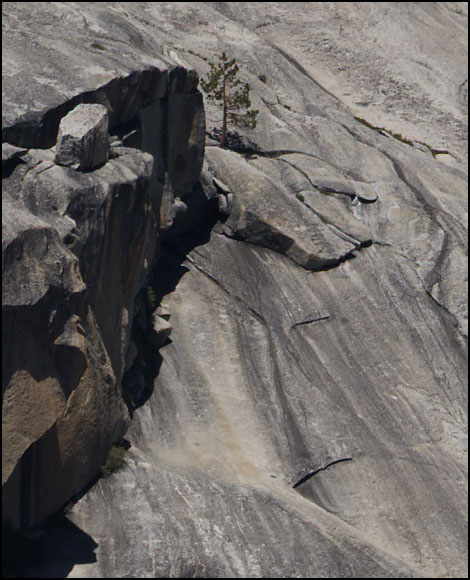
DETAILS from the above IMAGES: Dicomed image at 100%, Better Light image at 85% (to compensate for lens focal length difference).
Images were taken from slightly different viewpoints, which is why foreground and background don’t line up exactly.
| DICOMED image 2 PM July 1996 (at 100%) |
BETTER LIGHT image 5 PM July 2005 (at 85%) |
 |
 |
| Note the similarity in colors of the granite in both images above, with the Dicomed image on the left showing slightly more contrast in the rocks, and a much bigger difference in the trees, not all of which may be due to the Tone curve and lighting differences – I think a lot of these trees ARE a lighter green this year than they were nine years ago. The Dicomed image shows more visible color in the moving water because of its slower scan time, and also because it was scanned vertically, where the up-and-down changes in the water’s reflections caused more visible color artifacts from line to line. The Dicomed image also shows some disturbances in the alignment (registration) among colors (more visible in a magnified view, while cycling among the individual color channels) caused by a persistent breeze knocking the camera around on a less-than-stable tripod head. Notice how SLOWLY the trees grow at 8,000+ ft. elevation in the Sierras… |
| DICOMED image 2 PM July 1996 (at 100%) |
BETTER LIGHT image 5 PM July 2005 (at 85%) |
 |
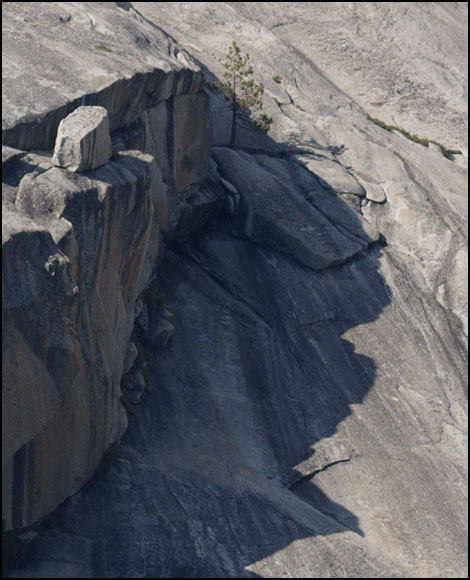 |
| While there isn’t much difference in the lighter tones between the image sections above, the shadows are more open in the 7-stop Better Light exposure than in the higher-contrast Dicomed scan. |
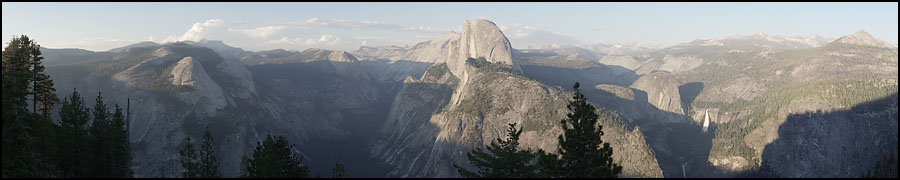
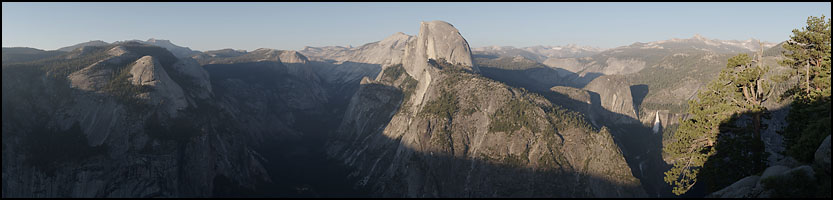
GLACIER POINT PANORAMA, YOSEMITE
 |
| |
Dicomed pano 1996 (at 90% relative to Better Light pano to compensate for lens focal length difference)
glacier 2 pano, July 7, 1996, 7:34 PM
6000 x 29998 (originally 40,055 lines) - 8 bits per color (24-bit RGB)
(originally set for 180 degrees, but later cropped to 135 degrees)
(had to be less than 30000 lines so 1996 Photoshop would open)
150mm lens at f-8.5 - Low contrast 8 Tone curve
1/50 sec. Line Time - ISO 200 Daylight
Total scan time 600 seconds for 515 Mbyte image file (for cropped section shown above) |
|
 |
| |
Better Light pano 2005
glacier point 04 pano, Tue Jul 19, 2005, 7:35:51 PM
6000 x 24996 (originally 29452 lines) - 16 bits per color (48-bit RGB)
(originally set for 150 degrees, but later cropped to 127 degrees as sun went down)
135mm lens at f-16 - Chrome 7 Tone curve
1/240 sec. Line Time - ISO 604 Daylight
Total scan time 108 seconds for 858 Mbyte image file (for cropped section shown above) |
|
Only a handful of Dicomed scanning backs were modified for panoramic operation. These early systems weren’t very elegant – one writer remarked that Steve Johnson’s Dicomed panoramic setup looked like “a view camera on life support” – but they were nonetheless capable of capturing huge, seamless panoramic images with the same high quality that the Dicomed scanning back was already becoming known for. At least, if you had plenty of time...
The 1996 Dicomed panoramic image above was captured from a viewpoint near Glacier Point. I chose a low contrast Tone curve with 8 f-stops of usable dynamic range, in an attempt to hold some detail in the dark foreground trees without overexposing the highlights. I initially captured 180 degrees of view in a 6,000 x 40,055 pixel image, but soon learned that Photoshop was limited to opening files with less than 30,000 pixels in either dimension, so I had to perform surgery on the original TIFF file to reduce the image to just under this limit. Using the fastest Line Time setting for the Dicomed, the image shown above took 600 seconds (ten minutes) to record.
The sky was certainly unexciting when I revisited Glacier Point for the 2005 Better Light panoramic image of this otherwise dramatic vista. This time the camera was situated at the very tip of the rebuilt viewing area, so there wasn’t anything directly in front of the camera, even when using a slightly wider lens. I chose a favorite Tone curve with 7 f-stops of range, and was able to use an aperture of f-16 with an ISO setting of about 600 and still operate at the Better Light’s fastest Line Time setting, so the image shown above took 108 seconds (less than two minutes) to record – over five times faster.
DETAILS from above IMAGES: Dicomed image at 90%, Better Light image at 100% (to compensate for lens focal length difference).
Images were taken from slightly different viewpoints, which is why foreground and background don’t line up exactly.
|