|
BETTER LIGHT'S 7th "Almost Annual" OWNERS CONFERENCE
October 2 – 3, 2008 Location: The Enterprise Center, Salem, MA |
||||||||||||||||||||||||||||
|
Speakers Share Some "Tricks & Treats" As Better Light owners we are very fortunate to be associated with photographers who have exceptional talent in a wide variety of specializations, and best of all, a willingness to share this experience with their peers.
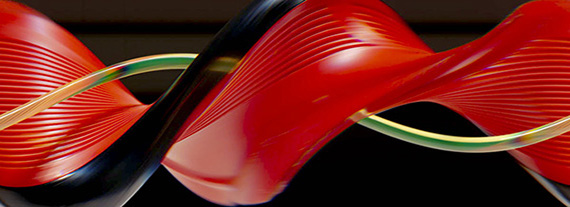
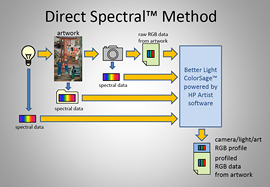
The 2008 Conference provided the stage for about a dozen of our Better Light experts to share some of their ideas, methods and tricks of the trade with the attendees. Below is a brief summary of some of the “tricks and treats” shared in our October conference in Salem. TIP #1 As the keynote speaker, Mike announced the new ColorSage™ application for a direct spectral workflow that will improve the accuracy of reproducing artwork and other critical subjects. When using standard ICC camera profiling, there are still many variables that can introduce color errors. ColorSage uses the spectral data of the artwork itself, plus the spectral characteristics of the camera sensor and lighting to perfect color reproduction. This process greatly improves color accuracy, removes subjective color-correction judgments, and incorporates a brightness-balancing function to correct for uneven lighting. It will take a little more time and effort in the capture stage, but could save hours in post-capture production to get proofs and prints to your client. More information on ColorSage is available on the Better Light website. TIP #2 As an additional “trick” to get the creative juices flowing, Mike showed a series of photographs done this past summer by his son Alex. The technique called “spinouts” uses the Better Light Pano/WideView™ Adapter with a tabletop mounted to the precision rotary motor base. When using the Pano adapter in the more typical Rollout mode, the camera sensor is vertical – with the scanning back inserted from the side of the camera. An object such as a vase rotates in front of the camera and a flat 2-dimensional image is created, much like removing the label from a coffee can.
For a “spinout” the scanning back is inserted from the top, so the sensor is horizontal (parallel to the base of the turntable). Any type of object can be placed on the turntable and rotated in front of the lens. The results are colorful, twisted shapes that can often be amazing abstract images. The concept is hard to grasp…even when you see the setup in person. Experimentation and patience is the key to success. Mike Collette has an article with more details and samples on the web site.
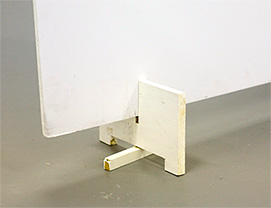
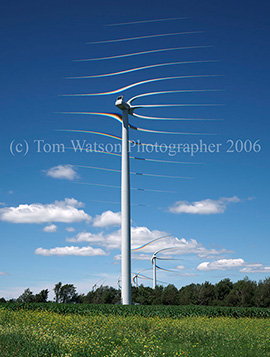
Mark VanderSys of Boise, ID attended the conference and couldn’t wait to try a “spinout” for himself. The only subject matter was a red and black handle utility knife and a simple bubble level. He didn't stop there and continued experimenting with a spinout image for his studio Christmas Card...now that's thinking out of the gift box! Click here to see a simple video on how it was done. TIP #3 Art and craft stores are great supply destinations. Textured mylar reflecting a colored seamless into the background works great without causing a color cast in the product. If you were using a colored gel to add blue to the mylar it would also contaminate the color of anything that the light hits. Place a sheet of silver reticulated mylar under the product and suspend a piece of colored seamless above and behind the subject so the camera sees the reflection of the color paper. Add a separate light on the paper to control the brightness of the color. Capture a prescan and make adjustments to the the position, tilt, and lighting on the colored seamless to get the results you need. TIP #4 Use small wooden feet to support sheets of 1/2 inch Gator board for reflectors around the studio. Two of these stands will hold up a 4x8 Gator boards. No additional light stands and clamps needed. The stands fold flat when done. The bottom center swivels about on a screw. TIP #5 When using the scanning back for products there are times when you need to increase depth-of-focus. Instead of completely filling the image frame, shoot from further back at a reduced crop area and not using the full frame of the sensor. Increase your resolution to gain the file size needed. When you move the camera back, the effective focal length increases since we are using less of the image circle. If you need to maintain a certain proportion or perspective, use a shorter focal length lens and maintain the smaller image size to maximize depth-of-focus. As another alternative, see the article on Helicon Focus software in the White Papers section of the website. TIP #6 Shooting outdoors with the Betterlight takes a high degree of organization and thought. Tom's equipment fits in a backpack or onto a rolling hand truck. Everything is packed the same way each time so he knows at a glance that every item and every cord necessary is there. The Betterlight in backpack configuration weighs just under 40# excluding tripod. When the choice is the hand truck, he carries the camera and laptop in a pelican case strapped to the hand truck. There is a shelf bolted to the top of the handle for the laptop. Always nearby, either backpacking (in the car) or working off the hand truck is Tom's "jockey box". This box contains extra cords, spare battery for the laptop, battery charger, head lamp, WD hard drive for backup, lens cleaning bits, spare tripod screws etc. TIP #7 Windmill: Because the CCD moves along the image plane, moving objects, moving either toward or away from the sensor, can create some interesting results. The results can only be estimated (guessed at) because the prescan is done at one speed and the scan at another. An object moving with the scanner elongates and an object moving towards the scanner shortens. In the case of this windmill, the blades are moving both away from and towards the scanner. As Tom stood beneath this windmill contemplating the results he might get, he knew the picture would be interesting but the final image exceeded his expectations. The only way to do this successfully is to load each image into Photoshop as you work and check the results…”trick or treat”!
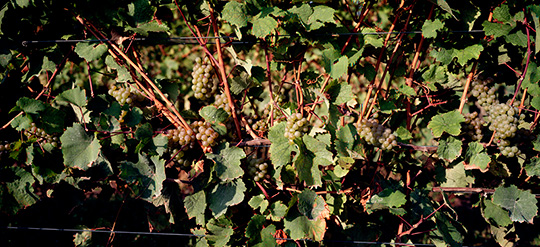
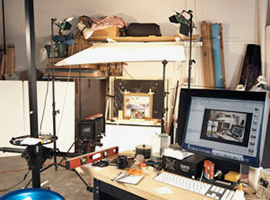
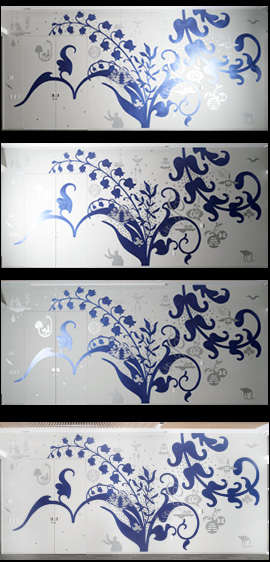
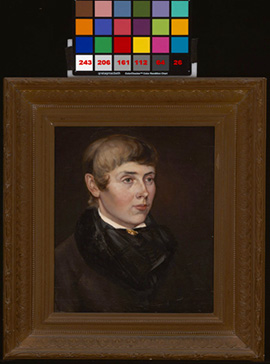
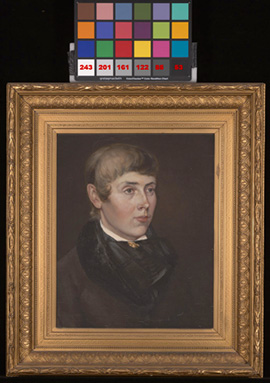
TIP #8 Outer Banks surf: You will be more successful using the Betterlight in the early morning because the light level is constantly increasing. This image of the surf was taken about 5:30 AM. Tom always has a headlamp in the case because in the early darkness it is impossible to see the keys on the laptop or the F-stop on the lens. Each time the camera is ready he dos a prescan, looks at the histogram, adds some windage for the time exposure and fires off a scan immediately. You have time for only a half dozen scans during this beautiful early morning light. TIP #9 Chardonnay grapes: This two-to-one panorama was done with the sliding back on the view camera instead of the Pano adapter. Tom made 3 images: right with 30 mm of shift, center and left with 30mm of shift. The right and left images were used to create this wide view. Line time in all cases was 1/200th of a second. There was a light wind rustling the leaves. In the final image there is very little noticeable movement among the leaves. TIP #10 Branding is what you need to do to make people think of you and your work in the way you desire. To create your brand: 1) Identify, research and understand your market. 2) Know your POD (Point of Difference). 3) Maintain the appropriate image for your market. 4) Select the direction that you feel good about. Part of creating your brand is to establish a consistent “look” for all of your marketing materials. To create a visual identity: 1) Be consistent with your “positioning”. 2) Develop a ligature or logo for your name. 3) Use the same colors and typefaces throughout. 4) Design a template that can be used for various pieces. TIP #11 Tom has the luxury of ample space in his commercial studio to keep a permanent setup for his art reproduction work. He has taken a different approach to lighting that has been very successful for him, capturing all of the texture of the artwork and rarely needing to use polarization. The original art is placed on a white tabletop with a large diffusion panel above the art (see photo). Tungsten lights are used on each of the four corners to provide illumination over the entire diffusion fabric. The white table, supplementary fill cards and adjustment of the lights can give additional control of the lighting of different art materials. TIP #12 While working for some high-end fashion companies, Jack realized that some products did not photograph well with a Bayer pattern (one-shot) DSLR camera — especially products with jewels and metallic features such as found on many designer purses and accessories. His first impulse (as a long-time Better Light user) was to grab the scanning back to improve the rendering of the tiny details. But, he wasn't satisfied and decided to try a 360-degree object movie to show all sides of these expensive handbags. His first test was capturing 40 images as the object rotated one complete revolution. When assembled the results were satisfactory, but the rotation was a little fast and choppy (see results). He adjusted the software settings in ViewFinder to 180 images...one every 2 degrees of rotation and created a smoother rotation movie. The images were balanced in Lightroom and scaled and named in Photoshop, then placed into Flash to create the movie. The final product was sized down to 3MB for fast loading. Click here to see two samples of the final object movies. TIP #13 Nothing’s ever easy. In this example Ben explained his assignment to photograph a wall-to-wall mural – with nowhere safe to put the lights. You have to think digitally and look at all of your available tools to solve the problem. In this case, Ben made three separate captures with the lights placed in different parts of the room. The images were composited in Photoshop to eliminate any glare on the painting and balance the density of the wall as if it was captured in a single exposure. TIP #14 There are times that cross-polarization is necessary, and again thinking digitally provides options in achieving the best reproduction. In this example the original antique oil painting was covered with a dull, matte varnish except for a few areas of the collar that were gloss varnish. With the unpolarized light the gold frame looked quite good, but the painting had some veiling of detail from the heavy matte coating, and this made the glossy collar look very out of place. With cross-polarization we have learned to accept the fact that not only do the highlights disappear, the contrast & saturation increases and the dark tones get quite a bit darker. In this case the metallic frame also became a “dead” dark brown. Although it looks better, it was still not true to the painting. The solution was taking a little of both images as a composite. The cross-polarized image was manipulated with the curves in Photoshop to lighten the dark tones to match the non-polarized ColorChecker, leaving the highlights alone, since they were correct. The modified polarized image was masked into the non-polarized gold frame to create the final image. TIP #15 The discussion of the features of ViewFinder™ was started with a touch of math and physics. Proper exposure is an important part of a successful scan and it can be controlled in a number of ways…each control method can be measured by f-stops. By understanding the relationship of your exposure controls, you have more options in achieving the best results. CAMERA LENS (Opening) LINE TIME (Speed) ISO (Sensitivity) NEUTRAL NUMBERS (Amplification) LIGHT INTENSITY and POSITION However, an often neglected factor of control is related to the position of the lights. All lighting is subject to the INVERSE SQUARE LAW which states that when you double the distance you have only one-fourth of the light intensity. That means that if you move a light from 4 feet away from the subject to 8 feet away, you have lost two f-stops of light. On the other hand, if you move a light in from 6 feet to 3 feet (reducing the distance by half) you GAIN two f-stops of brightness. Moving just 18 inches from 6 feet to 4-1/2 feet will gain one f-stop. This comes in handy with cross-polarization considering that moving the light closer could easily gain one f-stop or more to help your exposure. This difference is shown in photo #14 below that shows how light falls off from left to right very dramatically at close distances, however as the light-to-subject distance increases the light is quite close from side to side Photo Tip #15: Light falloff from side to side is more dramatic when the lights are closer to the subject. By moving the lights farther back, the light covers the image area more evenly, but will also loose a considerable amount of intensity.
Copyright 2007-09 Better Light, Inc. All Rights Reserved.
|
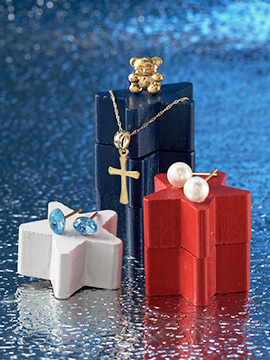
|
|||||||||||||||||||||||||||